How To Plan Checking Brake Disc Condition Through Wheel Spokes
A practical step-by-step guide to how to plan checking brake-disc condition through wheel spokes, including preparation, instructions, common issues, tips, and next steps.
How To Plan Checking Brake Disc Condition Through Wheel Spokes
Checking brake-disc condition through wheel spokes is a quick, essential maintenance task that helps you spot wear, cracking, or rust before it becomes a safety hazard. This guide walks you through a clear, methodical inspection process, from preparation to final checks, so you can confidently assess your brakes at home. You'll learn what to look for, how to interpret what you see, and when to seek professional help. No special tools are required—just good light and a careful eye. Regular checks can extend brake life and keep your stopping power reliable.
Fast Answer
- Park on a flat surface, engage the parking brake, and turn the steering wheel to expose the brake disc through the wheel spokes for a clear view.
- Inspect the disc surface for deep grooves, cracks, rust, or discoloration, and feel for a lip at the edge; compare both sides and check thickness if possible.
Before You Start
- Park the vehicle on a level, firm surface and engage the parking brake to ensure it stays still during inspection.
- Turn the steering wheel fully to the left or right to give you the best line of sight to the brake disc through the wheel spokes.
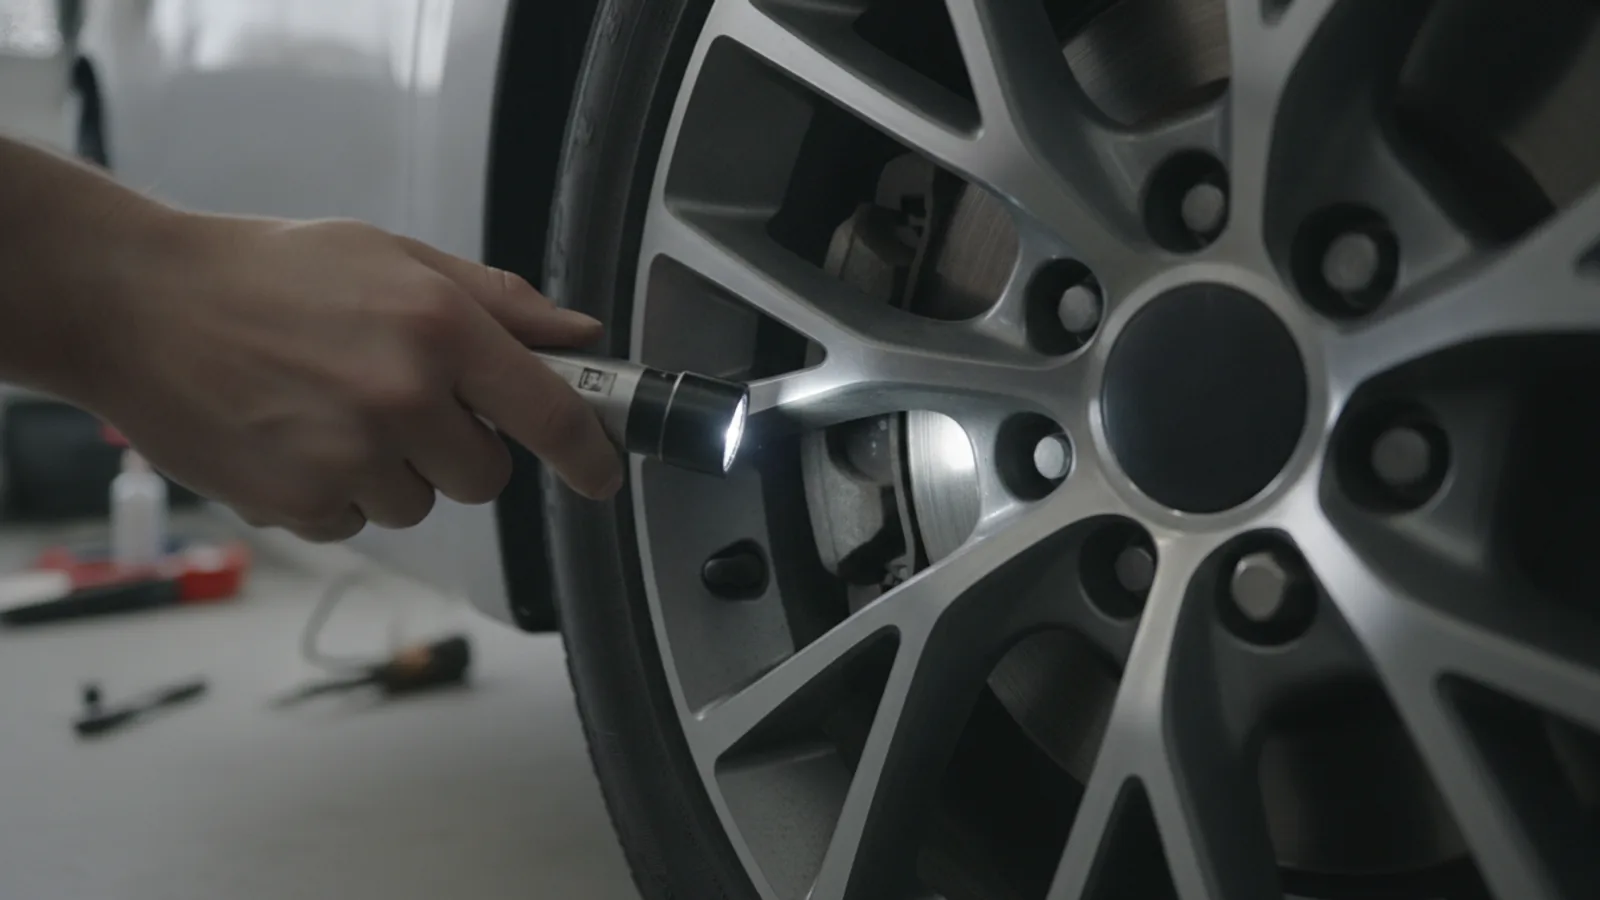
- Gather a flashlight, a small mirror (optional), and a clean rag to wipe away grease or dirt that might hide surface details.
- If the wheels are hot from driving, wait at least 30 minutes for the brakes to cool to avoid burns and get a true surface reading.
Step-by-Step Instructions
Position the vehicle and wheels for clear access
Start by parking on a level, flat surface and engaging the parking brake firmly. Then, turn the steering wheel all the way in one direction—for example, to the left—to angle the front wheel and reveal the brake disc through the wheel spokes. For the rear wheels, you may need to simply crouch low and look through the gaps. Use a flashlight to illuminate the disc area, shining it directly at the rotor surface. This position gives you a clear line of sight to the outer edge and part of the inner face. If the view is still obstructed, you can carefully rotate the wheel by hand to bring different parts of the disc into view. Why this matters: Without a clear view, you might miss early signs of wear or damage, so taking the time to position correctly ensures a thorough inspection.
Inspect the disc surface for grooves and scoring
Look closely at the flat surface of the brake disc. You are checking for concentric grooves or score marks that run around the disc. Minor, faint lines are normal, but deep grooves—ones you can feel with a fingernail—indicate significant wear. These grooves can reduce braking efficiency and cause uneven pad wear. Also, note any ridges that have formed at the inner and outer edges of the disc; these are often a sign that the disc is nearing the end of its service life. Run your finger gently across the surface (only when cool) to feel for any rough spots. If you find multiple deep grooves, measure the depth with a straight edge and feeler gauge if available; otherwise, compare the appearance with the other side of the same disc or the opposite wheel. Consistent grooving on both sides suggests normal wear, but one-sided grooves may point to a stuck caliper.
Check for cracks and heat damage
Examine the disc for any hairline cracks, especially around the edges or near the bolt holes. Cracks can form from extreme heat cycles and may eventually lead to disc failure. Look for blue or bluish-black discoloration, which is a sign that the disc has overheated at some point—this can harden the metal and make it brittle. Small, surface-level heat checks are common and not always critical, but if you see more than a few cracks or if they are deep, the disc needs replacing. Also, check the disc's thickness variation by feeling for a lip on the outer edge; a significant lip (more than 1.5 mm) indicates excessive wear. Use a micrometer if you have one, but if not, the visual signs are often enough to decide that professional help is needed.
Evaluate rust and corrosion levels
Surface rust on the brake disc is normal, especially after rain or if the car sits idle, because the discs are made of cast iron. A light, even dusting of rust that clears after a few stops is okay. However, you should be concerned if you see heavy rust in thick patches, flaking, or rust that covers a large portion of the disc. Such corrosion can weaken the disc and cause brake judder. Look for rust on the edges and around the ventilation holes (if you have vented discs). Use a wire brush to gently remove surface rust if it's light, but if the rust has caused pitting or deep layers, the disc may need resurfacing or replacement. Also, check the hub area for rust that might extend to the disc–this can indicate a leaking caliper or another issue.
Measure pad thickness through the caliper
While you can see the disc, also look at the brake pads through the caliper opening. The pad friction material should be at least 3 mm thick. If it looks thinner than that, it's time to replace the pads. You can use a flashlight to see the pad's edge; you might need to shine from behind the caliper. Look for an uneven wear pattern—if one pad is much thinner than the other, the caliper may be sticking. Also, see if the pad backing plate is touching the disc; that indicates metal-to-metal contact, which ruins the disc. Many pads have a wear indicator that makes a squealing noise when the pad is low, but checking visually is more reliable.
Perform a final comparison and decide on action
After inspecting one wheel, repeat the process on the opposite side of the same axle and then check the other axle. Compare the condition: both sides should show similar wear. If one disc is far more worn, scratched, or rusty than the other, investigate further—there may be a stuck caliper or a brake hose issue. Based on your findings, decide whether the discs are in good condition, need attention soon, or require immediate professional inspection. For minor surface rust, consider driving and braking gently to clean it. For deep grooves, cracks, or heavy rust, book a mechanic. Also, note any symptoms you've felt, like vibrations when braking, which could indicate a warped disc.
Quick Reference
| Situation | Action | Why it helps |
|---|---|---|
| Light surface rust on the disc after heavy rain or idle time | Drive the vehicle to a safe open road and apply the brakes moderately a few times to scrub the rust off. | The friction from normal braking will remove light, superficial rust and restore a clean contact surface. |
| Deep grooves that you can feel with a fingernail across the disc surface | Take the vehicle to a qualified mechanic to measure the disc thickness and check if resurfacing or replacement is needed. | Deep grooves indicate aggressive wear and reduce pad contact, which can lengthen stopping distance and damage pads. |
| Visible hairline cracks or blue discoloration on the disc edge | Stop driving and have the brake system inspected by a professional as soon as possible, and avoid hard braking. | Cracks and blueing signal overheating or stress fractures that could cause the disc to fail while driving. |
Common Issues
- You see thickness variation or a 'lip' on the outer edge of the disc.: If the lip is more than 1.5 mm deep, the disc is worn and needs replacement; if between 0.5 and 1.5 mm, check with a micrometer and consider resurfacing.
- Brake pedal feels spongy or vibrating when you brake.: Inspect discs for warping or uneven thickness; if found, replace both discs on that axle and bleed the brake system to remove air.
- One wheel's disc is significantly more rusty or worn than the other side.: Check the caliper on that wheel for sticking or a collapsed brake hose; repair or replace the faulty component and replace pads and discs as needed.
Advanced Tips
- Use a digital caliper to measure disc thickness at several points; if the difference exceeds 0.02 mm, the disc may be warped.
- When replacing discs, always replace them in pairs per axle to maintain balanced braking performance.
- After any brake work, bed in the new pads and discs by doing a series of gentle stops from moderate speed.
Final Checklist
- Disc surfaces are free of deep grooves, cracks, and heavy rust, with only minimal surface wear visible.
- Brake pad friction material is above 3 mm thickness on both inner and outer pads.
- No blue discoloration or heat spots appear on the discs, and the outer edge lip is less than 1.5 mm.
- Both sides of the axle show similar wear, and you did not feel any abnormal vibrations during a test drive.
FAQ
How often should I check my brake discs through the wheel spokes?
A quick visual check every month or whenever you notice brake noise or vibration is a good habit. A more thorough inspection every oil change or tire rotation (roughly every 10,000 to 12,000 miles, though it varies) helps catch problems early. This guide's procedure takes only a few minutes.
Can I tell if my disc is warped just by looking?
Often, warp is not directly visible; you might see a slight wavy pattern when light reflects off the surface. However, the most reliable sign is a pulsing or vibrating brake pedal. If you suspect warp, have a professional measure the disc's thickness with specialized tools.
Is it safe to clean brake discs with a wire brush?
Yes, using a soft wire brush or brake cleaner to remove light surface rust is safe and can help restore the braking surface. Be careful not to damage the disc surface with aggressive scrubbing, and always work in a well-ventilated area. Avoid using petroleum-based solvents that could leave residue.